
Guide to Making Schmidt Correctors
Contributed by Bob Pfaff
A few notes on making a Schmidt corrector by
the vacuum method. These were originally posted in 8 sections to the
ATM listserver.
First - Why the vacuum method?
- It is possible to generate a zone free plate with almost no
testing.
- The process is somewhat like making a spherical mirror (no
aspherizing to do).
- If the plate is a little under or overcorrected you can put the
correction on the primary mirror.
- Most any good glass can be used (I used BK7 and plates glass). I
have made two plates (11 inch and a 16 inch) and found them to be
interesting projects.
- Any advanced ATM with access to a metal lathe or who knows a
machinist friend that can make the vacuum pan should have no major
problems.
Part One - Literature and Formulae
The formulae and math needed to make a corrector plate are a bit
much to describe here. Besides, they can all be found in an article
- The Vacuum Method of Making Corrector Plates (Sky and
Telescope, June 1972, pg 388-393).
Most of the information is by Dr. Edgar Everhart from his article
in Applied Optics (May 1966, Making Corrector Plates by Schmidt's
Vacuum method). The math is here to do the design. I used the
partial vacuum method with 1/2 correction each side of the plate. No
need calculating Young's modulus because the plate deflection will
be measured with a dial indecator (see page 389 of the S&T
article). Also do not add extra deflection for the weight of tool as
the pan is filled with water; preventing extra deflection. Be sure
to do the example on page 392 to check your math.
Other articles of Interest:
- Construction of a 12 inch Schmidt-Cassegrain, Sky and
Telescope, November 1976, pg 382. (Some info on vacuum pan design
with water.)
- Wright Schmidt Construction Notes, RTMC 90 Proceedings.
(Special data on plate thickness, should be 1/30 to 1/40 of plate
diameter. 1/34 is best. Also includes a write up on the pan.)
- Amateur Telescope Making Book 3, pg 371-372
Related, but Not Using Vacuum Method:
- Australian 11.5 inch Wright, Sky and Telescope, May 1972, pg
320.
- Diffraction-Limited Schmidt-Cassegrain Telescope, Sky and
Telelescope, April 1966.
- Phoenix Amatuer's 12.5 Schmidt Cassegrain, Sky and Telescope,
April 1970, p254.
- Schmidt-Cassegrain Optical System with Flat Field, Part I, Sky
and Telescope, May 1965.
- Schmidt-Cassegrain Optical System with Flat Field, Part II,
Sky and Telescope, June 1965.
- Telescope Optics Evaluation and Design (you need this book)
Part Two - Tools
- The vacuum pan. I will describe this in the next section.
- One inch micrometer to measure the wedge of the corrector
plate. We want to keep the wedge to less them then .001". Enco
sells imported micrometers for as little as $10.00.
- Dial indicator that reads to .0001". The corrector plate will
be deflected in the range of .002" to .007". Enco has one listed
for $39.95.
- Convex grinding tool to grind the plate. I used a tile and
plaster tool. The tool was generated by grinding the back of my
primary mirror blank against it. To generate my larger 16" tool I
glued a 1/2 inch plate glass disk to a plaster disk and ground it
against the tool. Remember the tool will be convex in the range of
.002" to .007" almost flat. Use the spherometer to check this
accurately. You can stop fine grinding at about 500 grit.
- Special spherometer which has to be made to fit the plate
diameter. The spherometer should be large enough to just set
inside the edges of the plate. I built what I call a hybrid two
footed spherometer. A third leg at 90 degrees from the center like
a (T) shape is added so it will stand up leaving both hands free.
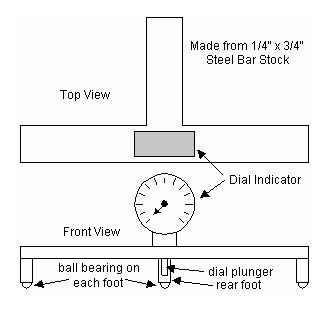

You can replace the dial indecater with a micrometer head and
have a great two footed spherometer to measure the sagitta of most
any mirror. For this you will have to measure the distance
accuratly between the balls. (Advanced Telescope Making
Techniques, Vol 2, pg 100).
- Your lungs. No you do not need a vacuum pump to pull the
little vacuum that will be needed.
Part Three - The Vacuum Pan
To make the vacuum pan a metal lathe is used. I machined my pan
from 6061T6 aluminum plate stock (very common in the metal world). I
purchased a square piece of plate (one inch thick for my 11" pan and
a 1 1/2" thick for my 16" pan). The corners were cut off with a wood
table saw. A cheap carbide tiped saw blade covered with lots of
motor oil was used on the saw to do this. Wear a safety face shield
for this operation! (A bandsaw with a metal cutting blade would
be my choice - Matt)
Three blind 1/4" � 20 holes are drilled and tapped in the back of
the plate for bolting to lathe face plate. A spacer such as a washer
is placed on each bolt between the face plate and the pan plate. I
used 1/2" ball bearings for washers. Do not bolt directly to the
face plate as this will distort the pan plate. Machine the pan 1/2"
to 1" larger then the optical diameter of the Schmidt plate. On the
front side of the pan the pan depth is turned to about .100" to
.150" deep. The inside of the pan is the optical diameter of the
Schmidt plate. In my case, I machined a 1/4" seal rim around the
pan. This can be less but I think the extra width of the rim gives a
better seal. Also, the 1/4" is covered by the Schmidt corrector cell
which will cover any turned edge.

Part Four - More on the Vacuum Pan
Now that the vacuum pan machining in the lathe is finished the
pan is removed. The next step is to drill an internal (L) shaped
hole in the pan that enters the side of the pan and exits into the
pan. (1/8" or less in diameter), see diagram.

A small valve such as a good gas valve is fitted to the entrance
hole on the side of the pan. A valve that had 1/8" pipe thread was
fitted to the pan by using a drill and pipe tap. I had problems with
some valves leaking, causing loss of vacuum. To fix the problem I
disassembled the valve, lapped the parts and reassembled it with
laboratory vacuum jar grease. A short length of small diameter hose
is attached to the valve which is used to suck the vacuum.
Last step in making the pan is to lap the seal rim. Lay a piece
of plate glass on some carpet. With some fine grit grind the pan rim
against the plate glass. Check the rim at many points around it for
flatness. Get the rim flat to .0001" or less. Use the spherometer
that was made to do this. This is the only critical part in making
the pan and like mirror making it is ground in. Also important is to
check this at about the temperature which you will be grinding and
polishing. I painted the inside of my pan with black lacquer. This
helps when checking for pits as the plate is polished out.
Part Five - Glass
I will start this part by stating that I have no knowledge of the
glass or optical business. I can relate my experiences with finding
glass for my two projects.
For the 11" plate I was able to obtain from an optical friend a
BK7 plate that was a clear glass with a coating used as a filter.
The wedge was only .0002" and the coating ground off as the plate
was ground. No problems here. As for the 16" plate I was not that
lucky. In this case I needed a 16" � 1/2" plate. Plane parallel BK7
would do the job. In this size I was quoted 1K plus dollars which
was out of my low budget range. I talked with another glass supplier
that had a glass called water white. He said it was plane parallel
and was for optical windows and filters. It sold for $100.00 per sq.
ft. but only came in 1/4" thickness. Next I located a glass dealer
that makes glass table tops. I ordered a 16" table top of a glass
that the dealer called crystal white. Also ordered was a 16" disk of
plate glass. Both were unedged or edge polished (big error as the
edge had 1/8" chips in the disks). The crytal white was almost white
and cost twice as much as plate glass but it had .015" wedge! As not
being up to grinding .015" wedge from a 16" disk I ordered a another
16" plate glass edged and polished disk. This one had only .0004"
wedge. Yes in a 1/2" thick plate it does have a green tint but in my
Schmidt camera this is no problem.
I think any good glass can be used in a plate if the thickness is
in the correct range and the wedge is .001" or less. (more if you
don't mind grinding the wedge out). The index of refraction only
needs to be in the ball park. How about those solar filters? The
coating will grind off. For you low budget people remember the
original 48" Schmidt had a plate glass corrector. A lot those SCT's
out there have green glass correctors also (looks like window glass
to me).
Part Six - Mounting the Plate to the Pan
The first thing to do is to zero the spherometer dial indicator.
Adjust the dial indicator in the spherometer so that there is enough
range to read the concave plate and the convex tool. Lay the plate
on some carpet then place the spherometer on top and zero the
indicator. Now lay the spherometer on a flat surface such as a
machinist's granite flat. Take a reading and record it. Any stable
flat could be used if you mark it where the spherometer will sit for
a reading. This is needed to calibrate the spherometer in case you
bump it or lose calibration. This reading may be different than was
recorded on the glass plate because the glass may not be flat.
Next the plate is sealed to the pan. I put a thin coat of
laboratory vacuum jar grease on the rim of the pan. Other thick
greases could be used. A friend had good luck with non-hardening
Permatex. The pan is filled with distilled water. The water should
be preheated and then cooled to drive the air from the water. Hard
water can etch glass. Lay the plate on the water filled pan. Try to
keep out as many bubbles as possible. A few bubbles will be no
problem. Place the spherometer on the plate. With safety goggles on,
as plates sometime break, suck on the small hose connected to the
pan valve while watching the dial indicator. When the plate is
deflected the correct amount, close the valve. I put RTV around the
edge of the plate to prevent vacuum leaks. After a few hours the
plate will loose some of its deflection due to squeezing out the
seal grease. Resuck the deflection. It should be stable for 24 hours
before any grinding is done. A .0002" change from day to day is
normal. Note the size of the bubbles under the plate. If they
increase in size there is a vacuum leak.
Once the plate deflection is stable start grinding with the
preformed tool. 500 grit is a good place to start. The pan-plate is
on the bottom but if you overshoot you can put the tool on the
bottom. Use very light pressure in your grinding. Check the tool
with the spherometer frequently as it will have to be reground to
shape now and then. Also check the plate deflection to be sure it is
holding. Grind through the grits like making a mirror down to 5 - 3
micron. Polish out with a standard pitch lap. After and beginning
each session recheck the deflection in case it changes due to
leaks.
It has been suggested by some ATM's to rotate the plate a few
times during grinding to minimize astigmatism. I prefer not to break
a good vacuum seal and loose the calibration. Because the plate is
to be ground on both sides I mark the plate and pan. When side 1 is
done I release the vacuum, turn the plate over and rotate 90 degrees
with respect to side 1. I think this should cancel most of the
astigmatism.
Now reseal and deflect the plate. Grind and polish as before.
Release the vacuum and the plate is finished!
Part Seven - Testing
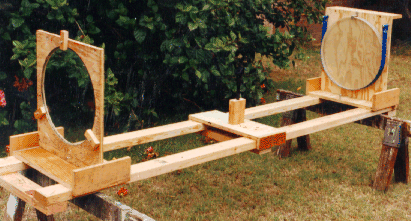
A simple way to test a Schmidt corrector plate used in a
classical camera is shown below:
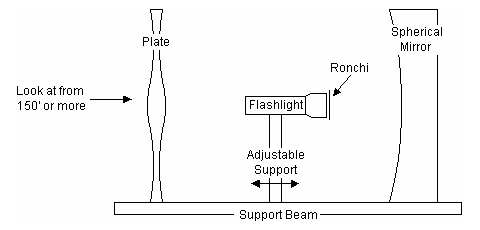
A test rig is made of wood. The corrector is at the RC of the
mirror. The flashlight is near the focus of the mirror, adjustable
and pointing at the mirror. The flashlight is covered with a ronchi
grating. Now look at the corrector from a long distance (150' or
more), the more the better. You should see straight lines. If the
lines flare at the top or bottom the collimation is off. Unless the
bands are grossly bad make any corrections on the primary. My two
plates needed no correction. I could only see some aberration with
one ronchi line showing which was probably the primary mirror. Just
for fun remove the corrector and take a look. The lines not only
bowed but the outer lines went into circles. For correctors in SCT's
or Wrights which are some percentage of a true Schmidt, the
corrector will be tested in the complete system. A flat (water,
mercury or glass) would be ideal. An artificial star as described in
Star Testing Astronomial Telescopes by Suiter with a ronchi grating
should work. As in the case of the true Schmidt the correction, if
needed, should be done on the primary.
Part Eight - A Few Extra Notes
Some things that I should mention:
- You might ask why the pan size is larger then the plate size.
The extra lip provides an easy way to seal the plate with RTV.
Also when you're done with the pan, the center can be cut out and
the outer ring machined into a cell for the corrector.
- A tip if you use a machine for grinding-polishing is to cover
the machine table with recycled pitch about 1/4" to 3/8" deep.
Groove about every 2 1/2". Warm the pitch with a lamp, place a 4
mil plastic sheet on top and lay the pan on top of the plastic.
Mark a spot on the table and pan so the pan can be replaced at the
same location on the table each time. This will help prevent
astigmatism. The pitch will float the pan but will not flex as the
tool overhangs the table on each stroke unlike carpet. (This works
great for mirrors also).
- A knife-edge test for the corrector was found with the help of
Tom Lum in ATM III pg 364. You place the corrector directly in
front of the spherical mirror and use a knife-edge tester at the
focus to read the zones. It is almost like testing a parabolic
mirror but the zone measures are double the distance. The formula
is delta R=y.y/R when both the knife-edge and lite source move
together. There is a lot other interesting information about
Schmidts including an article by Bernhard Schmidt in ATM III.
- I found another article on Schmidt plates using vacuum
deformation in Applied Optics, January 1972. Here they used slow
setting plaster pads in the pan to provide stiffness to the plate.
Anyway this will end my ramblings on this subject. I hope this
will inspire someone to try a plate. A little math, machining,
working with clear glass and willing to try something different can
be fun. :-)
Bob
Pfaff
4505 Merrill Street
Torrance, CA 90503